Friday, February 24, 2006

Butalbital/asa&caff Capsule

Finnish Fireplace - Poele Finlandais


This is a masonry heater aussi Called Finnish Fireplace. It Is A Very Powerful heating device That Could Help You Saving As Much as 75% of your heating bill. Does it Without Polluting na o atmosphere nor does it add "any co2 to Our breathing air. Have I built it myself. Find out how?

This stove is a stove mass also called Finns. It is a means of heating very efficient and powerful. it can help you reduce your heating bill by 75%. In addition it does not pollute and does not add CO2 to the air we breathe. I built it. See how

Wednesday, February 22, 2006

Famous Graves In London

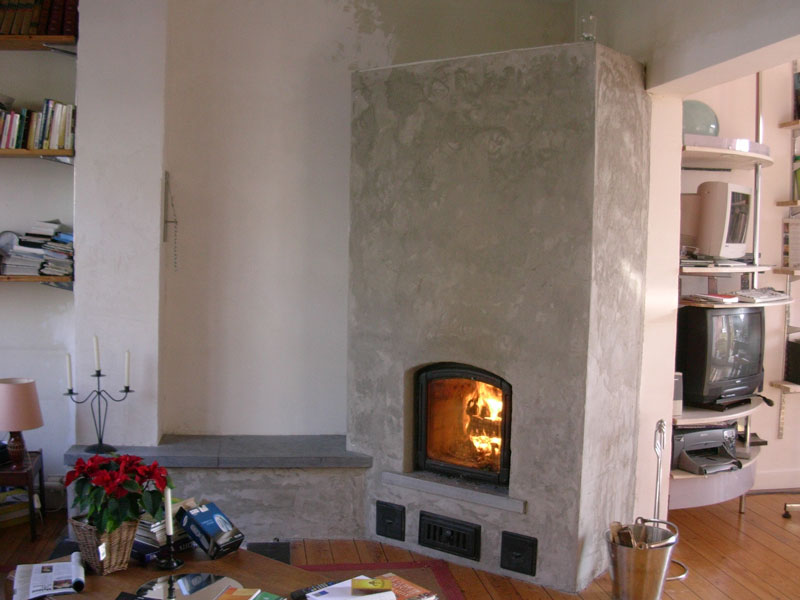
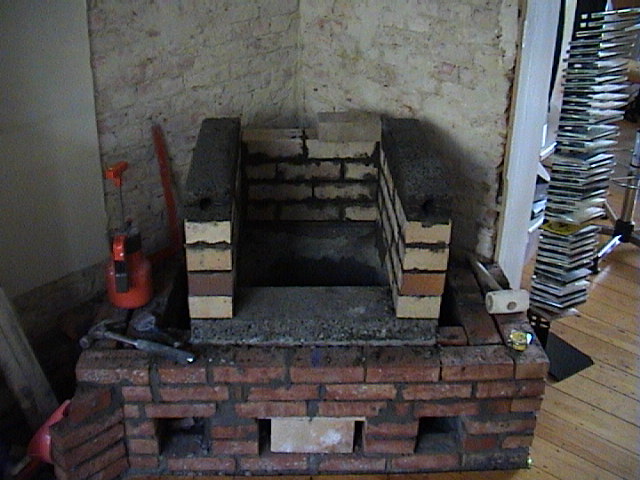
diy masonry heater how to make the perfect fire


Let me tell you right away: i keep trying. You see the difficulty is to deal with what appears to be contradictory demands. One the one side you need a lot of air to reach high temperatures in the firebox ( to get a clean combustion ) and on the other side the less air comes through the firebox, the more heat is transferred to the walls. There it is: a balance between these 2 objectives.

The balance is difficult to obtain consistently because it varies according the dryness of the wood, type of wood, draft of the chimney.

First dryness: you should never burn wood with a humidity content of more than 25%, the ideal being between 20% and 15%. Get yourself a humidity tester, i have a testo 606 
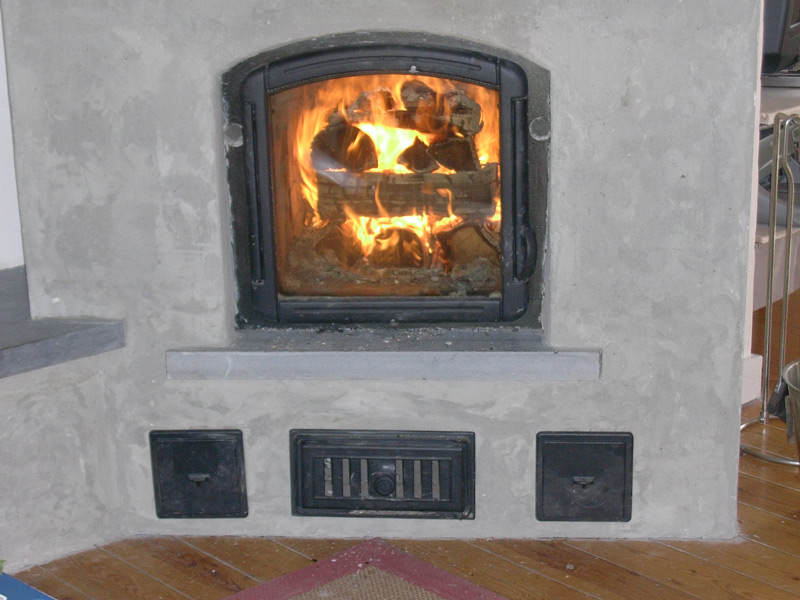
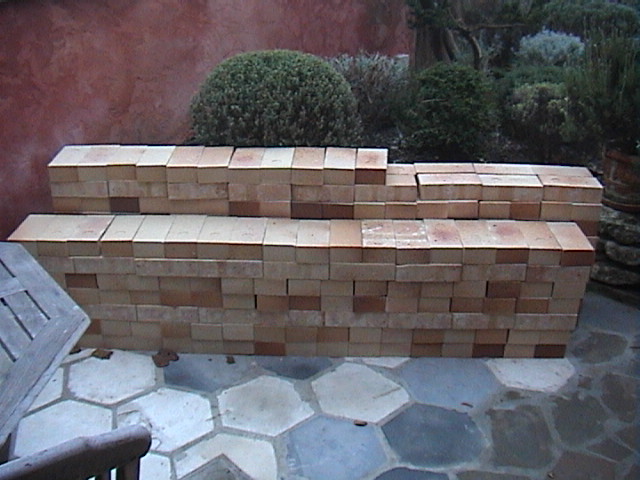
http://www.testo.com/ . Even so i have noted that the slightest variation in humidity from one batch to the other impacts on air demand. One good advice, prepare your next firing as soon as possible. This will help the wood to get evenly dryer. Second, the denser the wood the harder it is to reach good internal temperatures. Therefore when using dense wood split it smaller than other woods. As a rule the denser your batch the more air you will need to get it going. Go ahead and open the ashdoor fully yes fully for a while. For light and drywood use less air especially if you have strong draft. I would leave the door ajar until you have real big flames all around yours logs. Then close the door with the vents open. When the flames start lowering, close your damper by half. When the flames start to change in pattern and they look more like lingering, close your damper further as well as all upper vents or injectors if applicable. Now your aim is to finnish your fire as soon as possible. Reduce the ashdoor air intake whenever possible but not so as to compromise the fire. Bear in mind that you want to terminate the fire as soon as possible and remember that it is at this stage that you are losing a lot of heat through the chimney. Finally at the ambers stage close the damper almost completely and close the ashdoor vents almost completely. If your firebox is real hot this stage should not last long. in my experience i get good results mixing hard and soft wood. That seems to give me the best of both worlds: good heat from soft wood Helping the wood to release Their dense gas, and good heat radiating from The Embers Of The hard wood. I Told You It Is A Challenge

how perfect the fire? I bluntly tell you, I am not yet arrived to make the perfect fire. Exercise is not easy because you have married two contradictory demands. On one side there is a maximum intake air to achieve high combustion temperatures and achieve the nirvana of non-pollution and on the other there is less fresh air fewer cooling and the more heat will be transmitted. This balance is difficult to obtain because the parameters are changing all the time (Atmospheric pressure, wood quality, wood drying, mounting problems of logs, size of logs etc..).

The most important thing is to work with dry wood moisture 20% + - 5%. I have a moisture meter Testo 606 which makes me good service.

basic rule does not make a fire with wood that is dry. You lose a lot in efficiency and pollution increase efrrayante manner. That being so, I found significant variations in rates of moisture within the same batch. To standardize all, I load my home as soon as possible. The residual heat drying wood and turn it on when Vou, it will dry evenly.

Deusio a dense liberated its gas more difficult and must be split smaller. My experience is that most wood is dense and requires more air. Do not be afraid to open the door to the ash box (main air supply large). Unlike a wood very dry and light requires less air especially if you have a good draft. For lightweight wood I leave the door between the ash-open until the flames are at the highest and strongest. Then I close the door, leaving open the tie. The air at the bottom of door is always closed and the top open.

When flames begin to decline, close the valve and a third when they are frankly low, close to this 3/4.A your goal is to finish fire as soon as possible. Stir the remaining logs once but not twice. Reduce a little air drafts from the bottom (ash box) and those completely from top but not enough to cripple the draw. This difficult stage should not last very long if you had a very hot fire.
I will next time the role of the injectors.

Auto Auctions In Fredericton

diy masonry heater how to make it work


adress I Shall now what i find The Most difficulty hand: how to make it clean and efficient work. First: If You Have To Have or plan a masonry heater, go ahead and buy yourself a good contact thermometer. I personnally use a Testo 925 http://www.testo.com/ fit with a contact probe. I am using it in two ways. Firstly, during the first month or so i would regularly monitor the temperatures within the firebox ( i drilled a small hole in the door frame for the probe ). With that i was able to see the difference in temperatures whith changing air intake. That is a good way to learn how much air you need at which stage of the fire. We will come to this later. Secondly, i take t° readings on 2 points of the surface of the heater which i have determined. One at the front and one at the side. I take these readings every mornings at 8.00. I note them on a spreadsheet together with useful informations ( outside t°, how many fires, etc...). That is also important because At the End of the day it Which Is The surface temperature radiate Into the rooms. I know it all Seems very silly goal i can assure you UNLESS You That Have Some sort of special bonds With The Gods Of Fire, This Is The Only Way to Learn about your masonry heater and flue clean about aussi. Next I Shall Deal With The Fire Itself and Will try to share my modest experience.

Here's how to make a good fire, efficient and propre.Tout First, if you are considering buying or building a PDM run you buy a good thermometer of contact. I have a Testo 925, with a probe www.testo.com contact.Je employed in 2 ways. First

to control combustion temperatures was inside the home. During the first month I very often measured temperatures depending on the settings of the air intake. I therefor drilled a small hole in the door frame to pass the probe thermometer. It is a very good system to learn quickly how much air you need and at what stage. We will return.

Then I take the surface temperature every morning on 2 points. One is located on the front and the other is on the side. I note all this on a sheet exell and various parameters (t ° exterior, wood quality etc..) I know it sounds childish but I do not think so because ultimately it is the heat radiated before us and do not forget that we are looking for the perfect combustion. The next time we see the technique of fire with a PDM.

Gay Rental Sailing Boat Greece

diy masonry heater at work


Hello. I am back With A little bit of my experience about using masonry heater. We Have Had It Running for Nearly 2 months now. So far so good. No problems Whatsoever. Believe me the thing is amazing. At first the Walls to get dry and warm weekends The House bed one fire in the Morning and Another With One reload in the Evening. In the morning i have Measured average surface temperatures of 42°c. front /37°c sides. Now with my experience and a couple of minor improvments, we only lit one fire a day and temperatures are 44°c./39°c. In the evening before a new fire is lit the temperatures are still around 34°c/35°c, that is after nearly 24 hours. We found that this solution works well for us because it enables the central heating to kick on for 2x 1/2h per day. When we have 2 good fires/day i now have t° of 50°c et 41°c.
I found that i had an excellent draft in my chimney so that some hot air was escaping from my home made rooftop damper. I have solved that and found significant improvment. I do recommend rooftop dampers. it enables us to keep our upstairs bedroom confortable. The chimney runs into One of Them And We Keep the door open.
I am more and more positive about it. Next time i will in my view adress What IS The Most Challenging part of a masonry heater: make a good fire ...

Hello, I'm back with some user experience. It's been two months that it heats: NA. Believe me all this stuff is great. At first, after break, we were two fires per day, morning and evening (you know what is the new toy ...) to heat the walls. The morning I measured the surface temp of 42 ° to 37 ° front and sides.

Now highlight of my little experiment, we switched to a light / day. The measured temperatures are 44 ° and 39 °. The night before the ignition (ie 22 hours after) they are still 34 ° and 35 ° ... This method has the advantage for us to ensure that central heating snaps for a 1 / 2 hour 2x/day for parts unheated not the MDP. On weekends we do a good 2 outbreaks per day and t ° are 50 ° and 41 °.

I discovered that I was losing a lot of heat through my chimney leaking valve at 100% and I have corrected. I highly recommend the flip top of the chimney cat it can heat the floor also by radiation. Anyway I am more positive and I will next time, the partie la plus delicate: comment faire un bon feu.

Tuesday, February 21, 2006

Baby Acne More Condition_symptoms

diy masonry heater d24


There you are it is finished and working. I have plastered it with lime mortar. Note the heated bench covered with a granit stone ( the cat adores it ). Note also the stainless steel plate and cable to open the rooftop damper. The heater is now dry and i am monitoring the various effects on our heating bill and on our life. I shall keep you posted.

Voila c'est terminé et ca marche. J'ai enduit à la chaux. Notez la banquette chauffante recouverte de granit. Egalement la stainless steel plate and the cable controlling the valve to open fireplace chimney cap. I am trying to do evaluations of the various impacts on our heating and our life and I'll keep you posted.

Carrie Bride Microsoft

diy masonry heater d23


There you go: first firing. I Was surprised to see That We Had No Problem Whatsoever to get it started. To the right is my charming wife and to The Left The heated bench. Some finishing Left to Be Done.

Here and go to the first outbreak. No problem getting started. On the right of the photo my lovely wife and left the heated bench. Rest of polish finish .

Genital Warts Brazilian Waxing

diy masonry heater d22


the Existing chimney breast has been "Demolished. I Have Kept The only left outer wall and formed The New That Will chimney. I Could not Keep the old flue Because It Was not straight.

The existing chimney is demolished. I kept a wall on the left which will form one side of the new chimney. I could not keep the old because it was not right .

Magic Imovie From Vhs

diy masonry heater d21


The door arch Is Now Built With The door frame together. I Have Set a granite stone In The facings.

The vault door is built and the door frame is cemented on the perimeter. I incorporated a slab of granite before the door .

Laser Sailboat For Sale Oregon

diy masonry heater d20


The outer skin Is Now Being Built separated by a layer of ceramic fiber. I am using normal lime / cement mortar.

The outer wall is built. J'emploie un mortier classique chaux/ciment .

Electronic Instruments 1 .rar

diy masonry heater d19


The capping slab is on. It has been cast in a mould with Lafarge ciment fondu and artificial granulates. It was a heavy job ( 65kg )to carry it and put it in place. Note around it is ceramic fiber. The slab rests on the firebox on a thin layer of ceramic and comes right against the inner wall of the frame.

La dalle du dessus est posée. Elle a été coulée dans un moule avec du ciment fondu et des granules artificiels de chez Lafarge. Cela n'a pas été facile ( 65kg ) de la mener jusqu'en haut et de la positionner. Merci John, le gentil voisin. Notez la fibre céramique sur le pourtour. La dalle repose sur le foyer sur une mince couche de fibre céramique.

Intitle I-catcher Console Web Monitor

diy masonry heater d18


The photo is not very good and i apologise for this. Light problem i am afraid. I hope you can nevertheless see the firebox and the channels through it, the side smoke channels and the rear smoke channel. All i need to do now is to cast a capping slab that will sit on top of the firebox to seal it therefore forcing the smoke to go down the 3 channels.

La photo n'est pas très claire and I apologize. Light problem. I hope you distinguish the home and its ducts landscaped corridors of sidestream smoke and the back row. I must now pour the slab closure that will close the home and thus will force smoke down into the 3 channels.

Teething More Condition_symptoms

diy masonry heater d17


Light work today i had to expect to Other Commitments. I nevertheless managed to plaster the Outside of the Inner Frame. This Is An Important Step With looks to security. This Is to Prevent Any co leakage from The Smoke Channels to creep Through the outer wall and to Eventually Finish In The Room. The Inside Of The smoke Channels WAS aussi plastered together With The Outside Of The firebox as i was building it. The mixture Is The Same i used for masonry (clay / sand).

Short day today. I had other obligations. I still managed to coat the outside of the inside wall. This is important in level of security. This prevents any migration of CO to the outside wall and ultimately into the room. The interior was also coated with the outer wall of the home as and when the elevation. The coating is the same mix I used for this wall ( melange argile et sable ).

Anemia More Condition_symptoms

diy masonry heater d16


The cat is crossed, it is now to high for it to jump on! It did like sitting on top to get a good view over what we were doing. Well we will find a ladder. The frame is now at the same level than the throat. It will need to go another 4 bricks before we stop and put the capping slab.

Le chat est fache. Le pdm est maintenant trop haut pour sauter dessus! Il aimait bien comtempler la vue d'en haut. On lui trouvera une échelle. Les cotés sont à présent à la même hauteur que le foyer. Ils devront encore monter de 4 briques avant de déposer la dalle de fermeture.

Pokemon Silver Hm Remover

diy masonry heater d14 & d15


I know what you guys are thinking: this guy is slow and sleeps on his work. That's the way my wife is currently thinking. Honey will it be ready for next summer you think? Very very funny. It does not look like it but it grows higher ( the masonry heater that is). Look at the cd rack next to it and you will see that it is now 1.40 meters high. At the end of this working day it has to be higher tha my wife otherwise she kills me.

I know what you think: this guy is not fast. That's what my wife tells me this time. Honey, you think it will be finished for the summer ... Very funny. Look at the rack instead of cd jogger and you will see that the gear is more than 1.40 meters. Tonight he will be taller than my wife or I'm dead.

I am ok. The Thing Is Now Taller Than My Wife. The firebox now stands at 1.75 meters. In Fact The Sides Of The firebox Will not go even higher. Only the front Will Go Another 4 runs and 2 At The columns back to allow smoke to go Down the sides channels as well as "Down the back channel. I am mad at Bosch (yes The Tool Company). you remember i was telling you The Hard time i had cutting Those refractory bricks. I had tried it with with my Metabo diamond disk without succes, then i bought a Bosch PRO diamond disk. This was supposed to be the best of the best made among other uses for cutting refractory bricks. Mind you at 170€ it could well be... I used it on one brick then i stopped. it was useless. Luckily my dealer found another disk by a company called Inter Diamant. I bought it and i have to say it is fantastic. It goes through like in melted butter. The dealer kindly accepted to take the Bosch disk back and will settle this with Bosch.

Je suis sauf. Le pdm est a présent plus haut que ma femme. Le coeur réfractaire est a 1.75 metres. En fait les cotés ne doivent plus monter. Seul le devant et deux colonnes a l'arrière doivent encore up to 4 bricks to let the smoke in the 2 side ducts and the duct from the rear. I am furious against Bosch. I mentioned that I had trouble cutting these bricks. I first tried with my Metabo disc without success. Then a special disk Bosch firebricks to 185 €, much less good. I luckily found a diamond disk with a company called Inter Diamond. It is a wonderful disc. This cuts like butter. Ler seller kindly included me the disc and arrange with the Bosch brand.

I-catcher Console - Web Monitor

diy masonry heater d13


This Is important year internship in The Building Process: The Setting Of The Throat. The photo is taken from above and one Can See How the firebox Narrowed IS. That Is The throat Which Is The Purpose of Twofold 1 - to Reflect the heat back to the fire to heat Intensify and 2 - to Accelerate gasflow Therefor Creating The gas turbulence to Be reignited. The throat has been "melted and casted cement Alag With all from Lafarge Aggregates.

An important step: the construction of the bottleneck whose purpose is twofold. 1 - Think of flames to heat the home to increase the heat and 2 - speed up the flow of gas and thus create turbulence de gaz qui s'enflameront elles aussi. La photo est prise du dessus et on peut distinguer le goulet. Celui-ci a ete moulé avec du ciment fondu et des granules Lafarge.

Lymphoma More Condition_symptoms

diy masonry heater d12

Work is continuing albeit slowly. Considering the shape of the heater there is a lot of cutting to be done. I use a 230mm Metabo grinder http://www.metabo.com/ connected to a Festool vacuum cleaner http://www.festool.com/ . It works fine for the regular bricks. For the refractory it is a real pain. I have tried every trick in the book, diamond, regular even a metal disk. The best i have found is a regular stone disk. One disk Every Two cuts ... I Should Have Rented a wet saw.

The work continues. Considering the shape of the craft there are many cuts to make. I work with a 230mm Metabo Festool connected to a vacuum cleaner. It works without problems for ordinary bricks. For refractories is the galley. I tried everything (diamond oridnaire even a hard metal). The best is still hard but after 2 regular Bosh is out cuts. I would have to rent a wet saw.

Michiganwrestlingsinglets

diy masonry heater d11


The inner frame wall IS Being built. Note At The insulation back. I Dont't Want To Escape The Heat charming to my Neighbours. The white stuff is not material for Santa Claus beard ... It Is ceramic fiber, THE AIM of Which Is to allow for expansion.

The retaining wall is built inside. Note the insulation behind. I do not feel the heat go away next door. White wool that you see is not to make the barbs of Father Christmas or Saint Nicolas but ceramic fiber whose purpose is to allow the expansion of the various materials.

I-catcher Console - Web Monitor

diy masonry heater d10


Firebox IS Being built using low-duty refractory bricks and cement from Lafarge fondulite fireproof. Note The 2 black castings, These Are the secondary air injectors feeding air To The upper section of the Fire.

I started Construct the fireplace brick and refractory fondulite which is a refractory cement for Lafarge. Note the two black modules that have been cast before, and which are air nozzles distributing secondary air in the upper part of the fire.

Mississippi River Boat Boat Plans

diy masonry heater d9


The bottom IS finished and ready The firebox floor to accomodatie. Note The Smoke Channels Either we Sides of the firebox. From now one i will use refractory mortar pour la firebox core, clay mortar for The Inner frame and common lime / cement mortar pour la outer shell. Note aussi To The Left The Start Of The heated bench.

The bottom is finished and is ready to receive the base of the fireplace. Note the smoke circuits on each side. From now on I use refractory cement for the home, the cement of clay for the first wall and ordinary cement for the wall outside. Note the departure of the heated bench.

# I-catcher Console - Web Monitor

diy masonry heater d6,7,8


The first 3 races of bricks Have Been ugly. Now You Can See the ashbox clearly "in the middle on top of Will Which is The firebox. You Can Also note The Smoke channels are Either sides. The Two channels to join Will in The Left has a meter long liner Connecting with the Existing chimney.

The first 3 rows of bricks were laid. We can see the ash in the middle compartment above which comes home. Both sides of the chimney which will join the left in a pipe of 1m which will liaise with the existing chimney.

Kidney Infection More Condition_symptoms

diy masonry heater d5


I am satisfied with the various castings. I have done them with ciment fondu and artificial granulates all from Lafarge http://www.cimentfondu.com/ . It is guaranteed up to 1100°c and they claim it can cope well with thermal shocks. On the picture from left to right, air injectors, firebox floor, lintel beam for the door and underneath is the throat.

Je suis content des résultats des moulages faits avec du ciment fondu et les granules artificiels de Lafarge. Ils sont garantis jusqu'à 1100°c et peuvent résister aux chocs thermiques. De droite à gauche, les injecteurs d'air, le socle de la boite à feu, le linteau de porte et dessous, le goulet d'étranglement.

I-catcher Console-web Monitor

diy masonry heater d4


Professor 2xH out of finland has sent me the drawings for the fireplace. Very complete i must say with lots of technical infos such as number of bricks, kg of mortar, total weight of the fireplace and total output of kilowats. With all infos i have been busy collecting the necessary materials ( on the photos the refractory bricks ). I am also buiding the moulds for the castable elements such as firebox floor, capping, throat etc... I hope i'll finish thesis today.

2xH Professor of Finland sent me the plans are comprehensive and contain elements such as the number of bricks, mortar pounds, total weight and power per hour when the MDP is in operation. Thanks for the info, I ordered all the hardware (pictured refractory bricks). I built this molds for parts to be molded to know the floor of the fire box, the top slab, so the bottleneck ... I hope to finish today.

I-catcher Console -web Monitor

diy masonry heater d3


Back In The upstairs living room. To Prevent Part of the radiant heat to Go Down to the basement i have a Poured concrete slab Vermiculite Insulating 6cm.

back upstairs. To prevent heat from going to the garage I poured a concrete screed insulating vermiculite 6cm.

Create A Birthday Card Convertible Car

diy masonry heater d2


Work has started. I built a Supporting column in the basement to support The Weight of mh Which Is Going To Be around 3.4T. Hard Work.

The work began with the construction of a supporting column that will support the pdm 3.4Tonnes weight. Tough ..